(C7 bulb with 5W rating is shown for example only):
FAQ's
Trouble Shooting
Do's and Don'ts
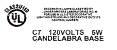
Use only UL Classified bubble light replacement light bulbs. You can tell this because the packaging of replacement bulb is marked similar to this:
|
(C7 bulb with 5W rating is shown for example only): |
|
||
Always use the correct wattage, 120V bulb as marked on white cord tag near plug. This tag will indicate the maximum wattage on it for the proper replacement bulb. It will read “CAUTION: Replace only with same type ____ Watt Max ____ UL Classified lamps.” Where the blanks are filled in with the type of bulb for the product. See bulb replacement under the trouble shooting section for more information.
You can find spare bulbs at retail stores or hardware stores, either in the seasonal lighting department or hardware department.
It is marked on the white cord tag located adjacent to the plug. It is usually located in a line that reads 120V, 60HZ, X.X A where X.X A equals the input current in Amps. For example 120V, 60HZ, 0.29A would have an input current of 0.29 Amps
This is equal to the input current (see above for determination) multiplied by 120. For example, for a set with 0.294A input current, the wattage would be 0.29 x 120 = 34.8 Watts. So the input wattage is 34.8 Watts.
Take the wattage calculated above times the number of sets you are using and divide this number by 1,000 (kilowatts) then multiply it by the number of hours used by your hourly utility kilowatt rate (found on your bill).
For example: 124.8 watts x 2 sets / 1000 x $0.10 per kilowatt-hour = $0.025 (2.5 cents) per hour for 2 sets.
NO or you may cause a personal injury or a fire hazard.
This is a marking required by UL (safety testing lab), and is intended to warn against the use of lights on the old style silver metal trees that had metal needles as this can be dangerous. Artificial trees with PVC or Mylar needles are not included in this warning, so it is ok to use on these types of trees.
Once the light is turned on it can take from 30 seconds to 5 minutes for the bubbling action to start when at temperatures over 65F. If it does not start after that, see the troubleshooting section for additional details.
The Vial contains 95% - 100% methylene chloride.
If liquid is ingested or comes in contact with your skin, contact your local poison control hotline and tell them that you came in contact with 95% - 100% concentration of methylene chloride.
If fluid gets in eyes, immediately flush with water and immediately contact your doctor or poison control hotline and tell them the fluid was methylene chloride.
If vial breaks but the fluid does not contact anyone, do not breathe in vapors, open window and ventilate room.
Clean spill by wearing rubber or latex gloves and dispose of rags or paper towel outside the building.
The liquid inside bubble lights will stain carpeting, vinyl flooring, upholstery, and other materials. You can try cleaning solutions such as AFTA.
NO, the unit is permanently glued together. If not replaced with the proper light bulb (size, wattage, temperature) the bubbling may not work, may create a fire hazard, or the vial may explode creating a personal injury hazard
The State of California requires that all products that contain lead in them (even if trace amounts) have this warning. For additional information on lead contained in wire insulation, go to the “The National Lead Information Center” web site (US EPA) at http://www.epa.gov/opptintr/lead/nlic.htm
Unplug lights, check that bulb is screwed in tightly. If still doesn't light after plugging back in, replace bulb (see instructions on how to replace bulbs below).
1. 1. Check the outlet by plugging another light or appliance into it to make sure power is present at the outlet.
2. If power is present at the outlet after checking per step 1, then do the following:
a. For sets with an end connector - Unplug string, make sure the maximum number of lamps doesn't exceed maximum allowed by checking the cord tag near the end connector (white tag with black print at end of string). The maximum number of lamps is typically 60. If it does have more than the maximum number, disconnect enough sets so that the maximum is not exceeded, then check the fuse in the first or second set as it is most likely blown (see instructions for fuse replacement below). Replace with spare 5A (large) fuse found inside plug, attached to plug, or in a plastic bag included with the set (or purchase a 5A replacement). If fuse blows again, replace light set.
b. For sets without an end connector - Check for blown fuse, replace with spare 5A (large) fuse found inside plug, attached to the plug, or in a plastic bag included with the set (or purchase 5A replacement). See instructions for fuse replacement below. If fuse blows again, replace light set.
1. Unplug set from the outlet by pulling on plug (do not pull on cord).
2. While grasping the plastic lamp holder, unscrew bulb from base by turning the plastic portion of the bulb counter clockwise. Be careful not to break glass vial on top of bubble light.
3. Replace bubble light only with a 120V, 5-Watt maximum UL Classified bubble light bulb. You can tell this because the packaging of replacement bulb is marked similar to this (C7 bulb with 5W rating is shown for example only):
(See FAQ section for where to find replacement bulbs). In addition, replacement bulb wattage information is located on the white cord tag attached to the set.
4. Screw bulb back into light set in a clockwise direction.
Caution – do not over tighten or glass / plastic may break
5. Check operation by plugging bubble light set back in.
1. Make sure the bubble light has been on for at least 5 minutes (light is on inside plastic base) and is well heated.
2. Make sure the temperature of the room is over 65 degrees F.
3. Gently shake bubble light to mix the fluid – Warning – do not break glass vial, be careful not to hit it against other objects.
4. If this does not work, gently tap glass vial with finger (careful, vial is made out of glass).
5. Bubble light should start to bubble after steps 1-4 have been completed/met
If available, please follow the fuse replacement instructions provided on the instruction sheet, as they are the most accurate for your set. If not available, use the following instructions:
Grasp plug and remove from receptacle or other outlet device, do not unplug by pulling cord. Open fuse cover by sliding open access cover on top of attachment plug towards blades, use of insulated screw driver may be required. Remove fuse carefully and replace with same rating/size fuse. Completely close fuse cover by sliding access cover. If access cover has latches, push cover closed so tabs latch.
Information: 5 amp 125 volt fuses are for use in C7, C9, G30, G40, rope lighting, bubble lights, flicker flame sets, and candles which contain replaceable fuses made in 1997 or after (sets made in 1997 and after indicate a manufacture date on a white tag).
WARNING - When replacing fuses, make sure light set is unplugged. Confirm fuse size and rating matches original fuse (fuse rating found on fuse plug, use only with plug marked “use only 125v, 5a max.”). Follow original instructions for fuse replacements whenever possible. A blown fuse indicates a short circuit or overloaded set. Disconnect additional sets before replacing fuse, if fuse continues to blow, discard product. Do not modify fuse holder to make replacement fuse fit.
- DON'T mount permanently. For temporary use only (90 days max)..
- DON'T mount near heaters, fireplaces, candles, ovens, or other sources of heat.
- DON'T mount with nails or staples.
- DON'T let lamps rest on cord or wire.
- DON'T let children play with product, or place within their reach.
- DON'T leave plugged in unattended.
- DON'T hang ornaments from cord or string.
- DON'T close door or window on cord or wire.
- DON'T cover bulb with cloth, paper or other material while in use.
- DON'T over tighten bulbs.
- DON'T change fuse while plugged in.
- DON'T try to insert plug into non-polarized outlet or extension cord (one plug blade is wider than the other).
- DON'T overload extension cords or outlets. Add up the maximum current of all the sets connected to the extension cord or outlet and make sure it does not exceed the marked rating on the extension cord (typically 13A) or the wall outlet (typically 15A).
- DON'T place on your indoor tree. Not recommended because of higher levels of heat from bulbs.
- DON'T let bulbs contact drapes, carpeting, upholstery, bedding, or anything that will burn.
- DON'T touch bulbs while lit. Hot surface! Allow bulbs to cool first.
- DON'T decorate or handle while plugged-in, may damage bulb causing increased temperature.
- DON'T install in bathrooms or within 10 feet of tubs, pools, fountains, or other bodies of water.
- DON'T plug in more than 60 bulbs end to end on sets with an end connector.
- DON'T use outdoors unless indicated on white cord tag near plug that it is for “indoor and outdoor use.”
- DO install the bubble lights with the vial pointing straight up for best performance.
Before using or reusing, inspect product carefully. Discard any products that have cut, damaged, or frayed wire, loose connections, cracked enclosures, or exposed wire.
- DON'T store outdoors or leave installed all year long (90 days maximum per year). Set will prematurely age and may possibly be damaged.
- DO store in a cool, dry location protected from sunlight. (The UV rays from the sun can damage the plastic so that it becomes brittle and fade colors.)
- DON'T attempt any repair to the light set by cutting, splicing, replacing plug, lampholders, or the end connector.
- DON'T try to replace the light bulb inside the plastic housing.
- DO replace bubble lights (entire assembly) and fuses (see above for instructions in the trouble shooting section).